

We will look at assembling white metal kits, etched brass kits and 3D printed kits in other posts, however an important and often considered mythical skill is scratch building. This basically means using raw materials to produce your own model, however that does not mean necessarily building your own chassis, or fabricating everything yourself. As you will see in this article you can make use of parts in your 'bits' box, or specific detailing parts to finish your model. All of these parts in the model below, excluding the bucket and chimney, are scratch built or available from suppliers online.
We will consider the scratch building of a 18" gauge prototype, the Hunslet 'Waril' class of well tank produced in number for the Ministry of Supply during the First World War for use at their sprawling depot in London at Deptford. After the war these small oil burning locomotives were sold off, with the most famous four finding a second home in Yorkshire on the Sand Hutton Light Railway. This agricultural line served farms, villages and a small brick works and made use of largely second hand vehicles and would make an interesting model. For the purposes of my railway I have ignored the gauge inaccuracy of using a ready to run 9mm gauge chassis, the outside framed 'Fiddletown and Copperopolis' steam locomotive produced by Minitrains. This can be sourced for less than £100 in a number of model shops.
To produce a model in this way you may need a few more tools so on top of the basic tool kit:
- a craft knife with angled blade *
- a cutting mat *
- a flat needle file *
- a liquid polysterene cement *
- a cyanoacrylate glue *
- a piece of fine wet and dry paper (about 320 or finer)
you will need a number of more advanced tools:
- a set of small drill bits (0.33, 0.45 and 0.7mm) *
- a hand held 'twist drill' *
- a set of reaming broaches of various sizes up to about 5mm diameter *
- a round needle file *
You will also need to source the following materials and parts:
- Minitrains Fiddletown and Copperopolise 0-4-0 steam locomotive
- various thicknesses of plasticard (10, 15, 20 and 30thou (thousanths of an inch)) *
- 0.45 and 0.7mm diameter brass rod *
- 3/4" diameter plastic tube (Evergreen) *
- various sections of plastic tube (Evergreen variety pack) *
- various sections of plastic section (Slaters variety pack) *
- brass U section (0.5 x 1mm) *
- fluid lead *
- smokebox dart *
- RT Models handwheel etch
- RT Models Penrhyn couplings
- Sand Hutton custom etches (designed by me, available through Narrow Planet)
- Archers rivet transfers, I got a pack for H0 tram cars (DCC supplies)
- chimney and smokebox door (Brian Madge)
- roof material (Meridian models Talyllyn coach roof or beer can)
(items marked with a * are available from Eileen's Emporium to whom I have no connection other than being a very satisfied customer).
If you are planning on building an identical model to me, then I recommend the excellent book by RCL publications on the Sand Hutton Light Railway. If you are using this article to inspire you to have a go with your own chosen prototype, I hope to split the steps down in a way that will help you follow your own path with a little more confidence, sharing some of my short cuts and bad habits as well as the basic model making process.
Part 1 - Making a start...

To make that first start you need to source a scale drawing (if at all possible) and as many photographs from different angles of the model you wish to produce. Armed with this information I use a photocopier to reproduce the drawings to the scale I am working in (1:76) and then pick up pencil and note paper before going towards the modelling work bench.
Working out basic assembly and details in this way will allow you to make more rapid progress and avoid frustrating mistakes. I find it helps to not only work out the main details but also the assembly order and thoughts on adding details. Whilst this is happening you might find it nice to 'run in' your ready to run chassis on a short circular test track as Minitrains models improve with a gentle running in.
Now you're ready to make a start - study the instructions supplied with your ready to run model if available to work out the safest way to dismantle the chassis from the body without damaging the valve gear. At this stage it is also worth making any planned modifications to the chassis such as cylinder overlays or modifications, then as you progress the body you know the final size and position of the cylinders, buffer beams etc. In the case of the Minitrains F&C chassis, I modified the cylinder block by removing most of the raised detail with a sharp knife and then filing them down with a flat needle file until they were more in keeping with the prototype.

Part 2 - The basic structure...

Now the cab is complete your thoughts can turn to the boiler. Many people choose to use off cuts of copper water pipe for this - however in my experience although you have a heavier boiler the finish is more difficult to achieve, with either rough or rounded cuts on each end, and having to work purely with superglue when adding details. To this end a variety of diameters of styrene tube are available from your local model shop or from an online supplier like Eileen's Emporium.
Once you have measured up the required size from the scale drawing this can be cut with a razor saw. The smokebox construction will vary depending on your prototype. Usually two identical parts, front and rear, spaced out with plastic sheet as required and glued and filed in to the correct shape. Fireboxes can be constructed in the same manner - if you have the need for a large radius curved edge use thicker plasticard to allow you to file this into the finished product.
Domes can be complicated to fabricate - again if not available off the shelf I recommend using styrene tube. If your exact diameter is not available it is possible to modify other sizes by either reducing the diameter in a drill using wet and dry paper with the piece rotating slowly (to avoid it melting) or increasing the diameter with a thin overlay of styrene - in which case allow at least 24 hours for the part to cure before further work. The hole in the top can be filled with Milliput or any other filler, and then the top edge rounded to match the prototype. To form the flare at the base of the dome it can be useful to heat up a rod or bar of metal on your electric or gas hob - I use a gas hob in the kitchen - be careful as this needs to be hot enough to melt the plastic - so is obviously too hot to touch with bare hands. Once it's up to temperature remove it from the heat source with oven gloves or tongues, place on a cork mat or similar to protect your work surface. You can then, holding the plastic tube in tweezers or pliers, carefully push down on the hot rod and generate a smooth natural flare. Once satisfied run the part under a cold tap to cure.
Boiler banding is added from microstrip - if you run the strip over the edge of a ruler between your thumb and the ruler it should wrap up a little, this curve makes adding the banding a little easier, make sure the join is on the underside of the boiler.
Buffer beams and chassis modifications are
Part 3 - Adding the details...

Adding details to be basic superstructure is the first glimpse of the model coming to life. Pipework often looks complicated but if you take each part and break it down it's really just a series of pipe runs that when added in the right order are easily formed and assembled.
You will need a variety of diameters of brass wire or rod, available from most model shops or direct from suppliers like Eileen's Emporium. I commonly use 0.33, 0.45, 0.7 and 0.9mm diameter. To form the required shapes a good pair of needle nose pliers are invaluable, and to fit them to the model it's useful to have a corresponsing set of small drill bits - I sourced mine from Eileen's Emporium at the same time - buy a multipack of the 0.45mm size bit, this is used the most, and these small bits are easily broken.
You will need a variety of diameters of brass wire or rod, available from most model shops or direct from suppliers like Eileen's Emporium. I commonly use 0.33, 0.45, 0.7 and 0.9mm diameter. To form the required shapes a good pair of needle nose pliers are invaluable, and to fit them to the model it's useful to have a corresponsing set of small drill bits - I sourced mine from Eileen's Emporium at the same time - buy a multipack of the 0.45mm size bit, this is used the most, and these small bits are easily broken.

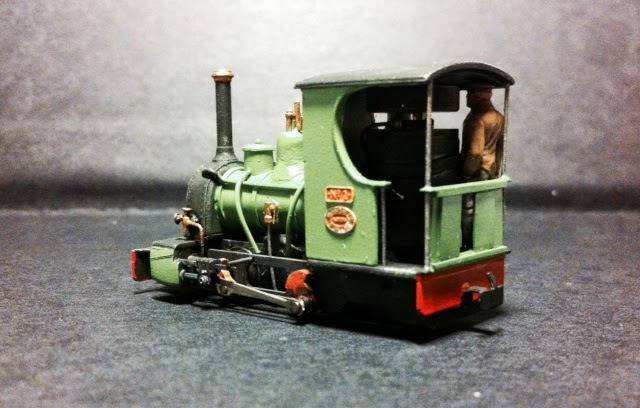
Some detail parts are available commercially, either from 4mm or 3mm suppliers. The smokebox door and initial chimney were from Brian Madge's Hunslet - he kindly supplied them - a drawing pin with some plastic strip for strapping would have also sufficed. The buffers are from RT Models. The rivets on the smoke box are a product produced by a company called Archers, and are resin rivets on a transfer backing allowing accurately spaced rivets to be applied quickly and easily - expensive but worth the outlay.
Not visible in this photo, but etched brass spectacle frames were added to the cab. RT Models offer some of these in their range, Narrow Planet can supply various styles and diameters as well - so email your requirements for a price. These sorts of small details can really lift your model. Note, the white-metal chimney was replaced with a turned brass example, which formed a master for a white metal version shortly available as a part from RT Models.
Part 4 - Painting and finishing...

The stage where a coat of primer is blown over the body is always exciting as it ties together the myriad of construction materials and shows you the promise of what you have created. I use a Halfords Car Plastic Primer, which is grey and doesn't harm the plasticard used in the model and provides a good base for further work. Apply in a well ventilated but relatively dust free environment and leave to dry for a few days to allow the primer to fully harden. Inspect the finish, look for areas where further smoothing and filling are required to get a good solid model. I use 'Squadron White Putty' which is a very fine filler in a tube and you can dispense small amounts and apply with an old knife or scalpel blade. It dries in ten minutes so can then be smoothed down to allow the model to progress.
There are basically three ways to apply the main colour of a locomotive, and all three have one thing you need to bear in mind in common - that is apply thin even coats!
It is possible, with good brushes and patience, to get a good finish by brushing on paint. It is also possible with a good quality aerosol to get a good finish with a 'rattle' can. However, I can fully recommend an airbrush. It is probably the one modelling tool I have bought that has paid for itself time and time again. Not only can you apply consistent paint finishes, but you can use it to weather your models, and seal the finish with varnishes. I can recommend spending up to £100 for an airbrush and compressor and their are plenty of options on eBay to pick from, the last one I picked up cost £70 and came with a compressor, regulator and two airbrushes - I added a moisture trap.
I only use Humbrol enamel tinlets. Stirred well these give consistent results and I know how they behave and trust them. There are other brands available, use what you are comfortable with. I often custom mix my colours to give a more realistic appearance. When modelling in miniature colours often need to be faded and washed out, so adding a little cream or tan often works well to lighten and fade blacks, blues and greens.

Use a good quality masking tape to cover parts you don't want to paint, and apply the paint evenly allowing at least half an hour between coats if airbrushing, or a good 12 hours if brush painting.
Once the base colour is applied I switch to a brush to apply the other colours, picking out buffer beams, smoke box and cab roof. Once these are thoroughly dry I then move onto detail painting of boiler fittings, linkages and the like. At this stage the model is becoming to come to life. To seal the finish from handling and fading I usually apply a coat of varnish or laquer at this point. I use 'Testors Dulcote' in small aerosol cans which gives a good smooth finish and is safe to use over Humbrol enamels.
The finishing touches are when you apply some 'life' to your model through weathering.
Start by applying a very thin wash of a dirty brown - I usually mix Humbrol 98 (Matt chocolate) and Humbrol 33 (Matt black). This is allowed to flow around the details of the chassis and buffer beams, and can be introduced to the footplate and any flat horizontal surfaces such as the tops of tanks, sandboxes etc, to simulate the collection of dirt that isn't cleaned. If you want a dirtier appearance this can also be applied to the main body, and then wiped off in a smooth vertical motion to leave residue around rivets, fittings etc - but be careful not to over-do this effect.
Once this has dried I dry brush Humbrol 53 (Gun-metal) on any metal surface that may be worn such as cab steps and the floor of the cab. It can also be used on the smokebox to hi-light edges and rivets so they catch the light a little.
Weathering powders can be applied sparingly on the chassis and footplate to introduce both texture and shadow. I use Mig Weathering powders, and use only 'Europe Dust' and 'Black Smoke' - these are semi-permanent, they do wear with time so must be protected with a coat of Dull-cote if you want them to stick for good.
Finally I use an airbrush to add frame dirt, soot and dust. Starting with a dust, I use a dirty cream colour mixed from a cream base with a touch of Humbrol 98. This is gently applied to the models flat surfaces from above. I then apply a frame dirt, usually neat Humbrol 98, sometimes slightly darkened with a touch of Humbrol 33. This is applied from the underside of the model to the frames and undersides of the cab, tanks, cylinders and footplate. You may choose to protect the treads of the wheels, otherwise these will need cleaning prior to running. Finally a coat of 'soot' is applied using Humbrol 33 lightened with a touch of Humbrol 98 to the chimney top and over the cab roof. If modelling a diesel this can also be used around the exhaust. This results in a super matt effect which perfectly represents a sooty roof often found on the prototype.

So now your model should be finished and ready for use on your layout. You have produced your very own creation, something unique to you and your layout and to be proud of - and hopefully this article has inspired you to have a go - and perhaps even encourage others to do so. Remember this is a hobby and we never stop learning!
I saw both your layouts at the Macclesfield show yesterday and I was very impressed. Can we please have some photos of Creech Bottom - I wish I had taken some myself yesterday.
ReplyDeleteThanks - Creech Bottom will get a section on this website shortly. In the meantime there is a photo album of the build and finished layout here: https://plus.google.com/photos/106534770310464254590/albums/6126583906718941697
Delete